Blogs >> Technology >>
20% off- import/transcode camcorder AVCHD MTS files to Windows Movie Maker for editing
20% off AVCHD MTS Converter-import/transcode camcorder AVCHD MTS files to Windows Movie Maker for editing
Last 3 Days Only! Never miss Pavtube 2012 New Year Coupon Codes, from which you get lowest-priced Christmas Promotional Gifts from http://www.pavtube.com – up to 30% discount on videos converter software that helps you customize all kinds of videos to portable media devices (iPad, Android tablet, smartphones and more)!
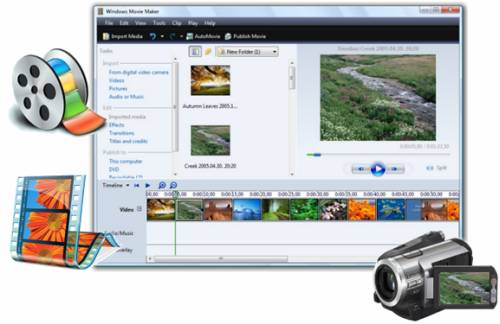
As we all know, Windows Movie Maker(WMM) is a free video editing software installed on a PC using Microsoft Windows OS. In order to import MTS files from Canon/Sony/Panasonic/JVC/Samsung camcorder to Windows Movie Maker to edit, format conversion is must. This article will show you how to transfer AVCHD MTS files to Windows Movie Maker for editing using Pavtube MTS files Converter .
For your reference-Windows Movie Maker accepted formats:
.WMV, .ASF, .MPG (MPEG-1), .AVI (DV-AVI), .WMA, .WAV, and MP3
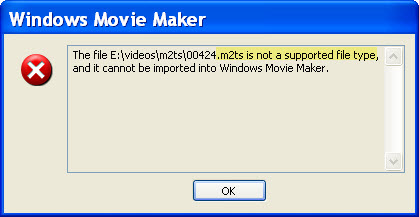
Additionally, the Windows Vista Home Premium and Ultimate editions of Movie Maker support importing MPEG-2 Program streams and DVR-MS formats. It is obviously that AVCHD MTS and M2TS files are out of the above mentioned formats range. If you try to capture these videos to Windows Movie Maker, it will prompt you that:
Step 1: Free download Pavtube MTS files Converter, install and run it.
Once run it, you can click “Add” button to import your .mts and .m2ts AVCHD files.
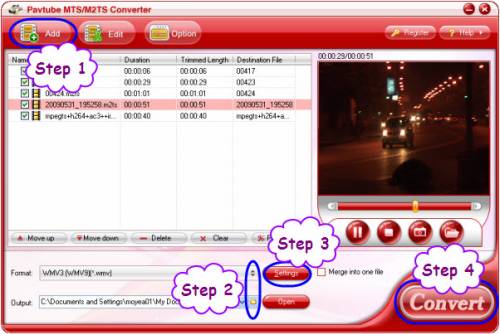
Step 2: Select output format for WMM and set destination folder
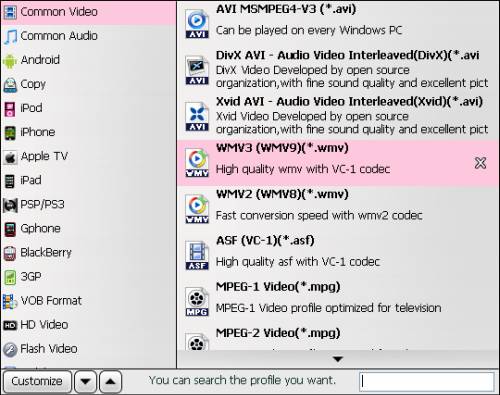
Click the pull down menu of “Format”, then you will be able to select a Windows Movie Maker supported format from the output format profile,we choose .wmv for example.
Meanwhile, click the folder icon at the end of “Output” to specify where to save the output files for your WMM, if not, this program will export them to the default save path automatically. BTW, if you want to combine multiple .mts and .m2ts files into a single file, you can tick off the checkbox “Merge into one file” to realize this goal.
Step 3: Adjust video and audio settings to optimize output file quality
Click “Settings” button, then you will be able to adjust audio and video parameters on the popup window to customize the output file quality, these adjustable parameters include codec name, aspect ratio, bit rate, frame rate, sample rate, and audio channel.
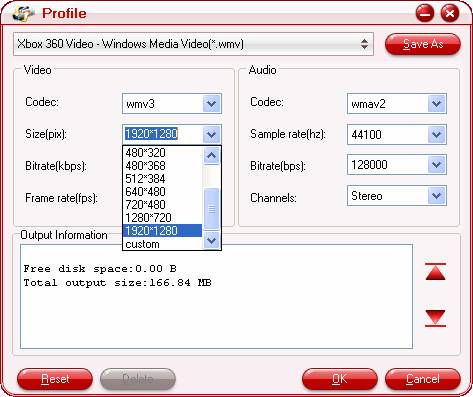
Step 4: Click “Convert” button to transfer AVCHD MTS files to Windows Movie Maker
Once the conversion is finished by Pavtube MTS file Converter, you can click “Open” button to get the output files effortlessly.Just import the converted files to WMM for editing via its “Import video” option.

Pavtube announced 2011 Best New Year Gifts products including:
For Mac Users:
Blu-ray to iPad Converter for Mac 30% off
20% off Video Converter for Mac
20% off HD Video Converter for Mac
20% off DVD Ripper for Mac
15% off iMedia Converter for Mac
For Window Users:
30% off Blu-ray to iPad Converter
20% off Blu-ray Ripper
20% off DVD Ripper
20% off Video Converter
20% off HD Video Converter
15% off Blu-ray Video Converter Ultimate
15% off Video DVD Converter Ultimate
Last 3 Days Only! Never miss Pavtube 2012 New Year Coupon Codes, from which you get lowest-priced Christmas Promotional Gifts from http://www.pavtube.com – up to 30% discount on videos converter software that helps you customize all kinds of videos to portable media devices (iPad, Android tablet, smartphones and more)!

As we all know, Windows Movie Maker(WMM) is a free video editing software installed on a PC using Microsoft Windows OS. In order to import MTS files from Canon/Sony/Panasonic/JVC/Samsung camcorder to Windows Movie Maker to edit, format conversion is must. This article will show you how to transfer AVCHD MTS files to Windows Movie Maker for editing using Pavtube MTS files Converter .
For your reference-Windows Movie Maker accepted formats:
.WMV, .ASF, .MPG (MPEG-1), .AVI (DV-AVI), .WMA, .WAV, and MP3
Additionally, the Windows Vista Home Premium and Ultimate editions of Movie Maker support importing MPEG-2 Program streams and DVR-MS formats. It is obviously that AVCHD MTS and M2TS files are out of the above mentioned formats range. If you try to capture these videos to Windows Movie Maker, it will prompt you that:

Step 1: Free download Pavtube MTS files Converter, install and run it.
Once run it, you can click “Add” button to import your .mts and .m2ts AVCHD files.

Step 2: Select output format for WMM and set destination folder
Click the pull down menu of “Format”, then you will be able to select a Windows Movie Maker supported format from the output format profile,we choose .wmv for example.

Meanwhile, click the folder icon at the end of “Output” to specify where to save the output files for your WMM, if not, this program will export them to the default save path automatically. BTW, if you want to combine multiple .mts and .m2ts files into a single file, you can tick off the checkbox “Merge into one file” to realize this goal.
Step 3: Adjust video and audio settings to optimize output file quality
Click “Settings” button, then you will be able to adjust audio and video parameters on the popup window to customize the output file quality, these adjustable parameters include codec name, aspect ratio, bit rate, frame rate, sample rate, and audio channel.

Step 4: Click “Convert” button to transfer AVCHD MTS files to Windows Movie Maker
Once the conversion is finished by Pavtube MTS file Converter, you can click “Open” button to get the output files effortlessly.Just import the converted files to WMM for editing via its “Import video” option.

Pavtube announced 2011 Best New Year Gifts products including:
For Mac Users:
Blu-ray to iPad Converter for Mac 30% off
20% off Video Converter for Mac
20% off HD Video Converter for Mac
20% off DVD Ripper for Mac
15% off iMedia Converter for Mac
For Window Users:
30% off Blu-ray to iPad Converter
20% off Blu-ray Ripper
20% off DVD Ripper
20% off Video Converter
20% off HD Video Converter
15% off Blu-ray Video Converter Ultimate
15% off Video DVD Converter Ultimate
|
|
