


Blogs >> Technology >>
Convert/Transfer Camcorder MXF files to QuickTime MOV with MXF file converter Mac

What is MXF file?
From wiki.com: MXF is a “container” or “wrapper” format which supports a number of different streams of coded “essence”, encoded with any of a variety of codecs, together with a metadata wrapper which describes the material contained within the MXF file.
Most MXF media files are from two data-recording camera systems, Sony’s XDCAM and Panasonic’s DVCPRO P2. These camera footages are mutually incompatible due to opaque subformat options obscured behind the MXF file extension. Without conversion tools, it is impossible to distinguish these incompatible formats.
Pavtube MXF file Converter Mac is the best MXF file Converter for Mac users, Mac MXF File Converter can help us transfer mxf file to quicktime mov on mac (including friendly video format like mpeg, wmv, avi, mp4, etc). It is a simple, useful, and powerful Mac MXF Converter.
Now please refer to the following guide how to Convert MXF to QuickTime MOV with Pavtube MXF file Converter Mac.
Step 1. Import Panasonic P2 MXF to the powerful MXF file Converter mac.
Run the MXF to QuickTime MOV Video Converter, click “Add” button and import the MXF files you’d like to convert, click “Choose” to confirm. Or you may drag and drop the files to the MXF file Converter.
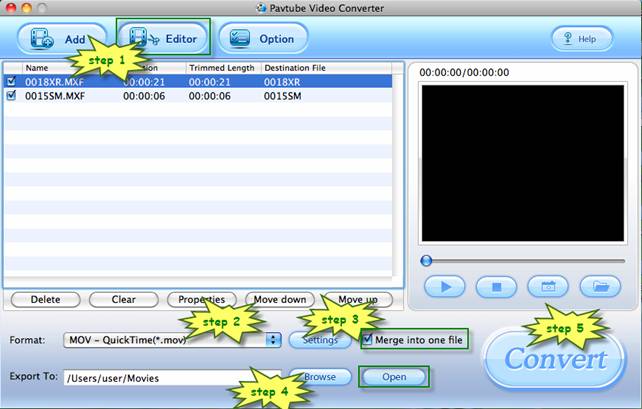
When the MXF files are loaded to the program, you can view the videos from the Preview window. Simply select an item and click the “Play” button. When the video is playing, you may take snapshoot by clicking the “Snapshoot” button when it plays to your favorable frame.
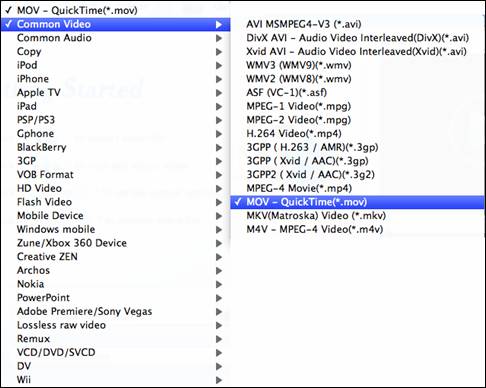
Step 2. Select output format- QuickTime MOV, H.264 MOV.
The Pavtube MXF file Converter Mac is capable of transfering MTS, M2T, MXF files to QuickTime MOV, MP4, MOV, M4V, QuickTime MOV and various other optimized formats for portable devices. Pavtube MXF file converter mac provides QuickTime MOV formats with xvid and H.264 codec. Since we are transfering MXF video to QuickTime MOV, ,what you need is to click on the “Format” bar, follow “Common Video” and select “QuickTime MOV” format in order to save storage. To get higher quality, please click on “HD Video” tab and choose “HD MOV” format.
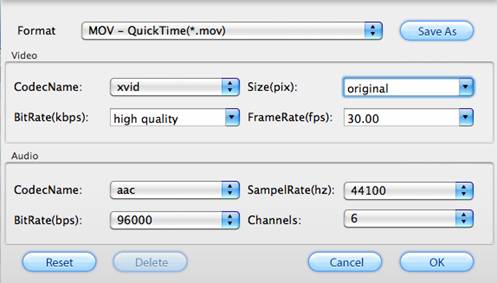
Step 3. Set video and audio bit rate, frame rate, channels, etc.
You may also customize video and audio parameters in Settings panel. Simply click “Settings” button to and set the bitrate, frame rate, channels, sampling rate as desired values. What you are doing is down-scaling the file size, and the trick lies in video and audio bit rate. The video bit rate of Panasonic P2 MXF can be up to 100mbps! That’s extremely high! What bit rate is best? It depends on your needs. The video bit rate of a commercial blu-ray disc is around 30mbps. And standard DVD? 5-10mbps. The lower bit rate you set the smaller file size you get. You’d better try with some smaller files first before Stream all MXF files to QuickTime MOV.
Step 4. Specify a folder to save the converted QuickTime MOV files.
Click the “Browse” button next to “Export to” field and specify an output folder to save converted files. Click “Choose” to confirm.

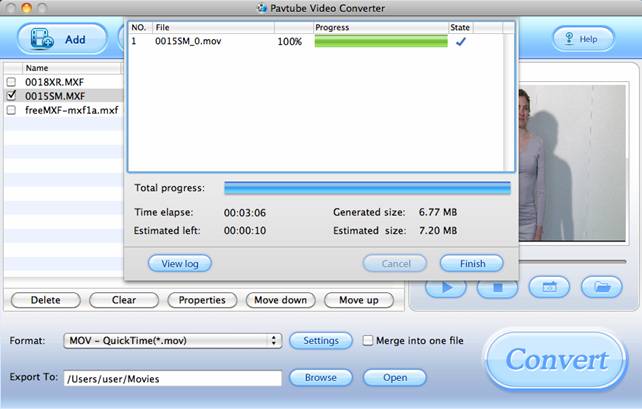
Step 5. Start transcoding MXF to QuickTime MOV
Click “Convert” to start converting MXF to QuickTime MOV format when everything’s ready. The MXF Video Converter supports batch conversion so you may load multiple MXF files and convert them to QuickTime MOV at one time. You may also join MXF files together by checking the box “Merge into one file” before conversion starts. After conversion you may click “Open” button to find generated QuickTime MOV files and use them freely.

From wiki.com: MXF is a “container” or “wrapper” format which supports a number of different streams of coded “essence”, encoded with any of a variety of codecs, together with a metadata wrapper which describes the material contained within the MXF file.
Most MXF media files are from two data-recording camera systems, Sony’s XDCAM and Panasonic’s DVCPRO P2. These camera footages are mutually incompatible due to opaque subformat options obscured behind the MXF file extension. Without conversion tools, it is impossible to distinguish these incompatible formats.
Pavtube MXF file Converter Mac is the best MXF file Converter for Mac users, Mac MXF File Converter can help us transfer mxf file to quicktime mov on mac (including friendly video format like mpeg, wmv, avi, mp4, etc). It is a simple, useful, and powerful Mac MXF Converter.
Now please refer to the following guide how to Convert MXF to QuickTime MOV with Pavtube MXF file Converter Mac.
Step 1. Import Panasonic P2 MXF to the powerful MXF file Converter mac.
Run the MXF to QuickTime MOV Video Converter, click “Add” button and import the MXF files you’d like to convert, click “Choose” to confirm. Or you may drag and drop the files to the MXF file Converter.
When the MXF files are loaded to the program, you can view the videos from the Preview window. Simply select an item and click the “Play” button. When the video is playing, you may take snapshoot by clicking the “Snapshoot” button when it plays to your favorable frame.
Step 2. Select output format- QuickTime MOV, H.264 MOV.
The Pavtube MXF file Converter Mac is capable of transfering MTS, M2T, MXF files to QuickTime MOV, MP4, MOV, M4V, QuickTime MOV and various other optimized formats for portable devices. Pavtube MXF file converter mac provides QuickTime MOV formats with xvid and H.264 codec. Since we are transfering MXF video to QuickTime MOV, ,what you need is to click on the “Format” bar, follow “Common Video” and select “QuickTime MOV” format in order to save storage. To get higher quality, please click on “HD Video” tab and choose “HD MOV” format.
Step 3. Set video and audio bit rate, frame rate, channels, etc.
You may also customize video and audio parameters in Settings panel. Simply click “Settings” button to and set the bitrate, frame rate, channels, sampling rate as desired values. What you are doing is down-scaling the file size, and the trick lies in video and audio bit rate. The video bit rate of Panasonic P2 MXF can be up to 100mbps! That’s extremely high! What bit rate is best? It depends on your needs. The video bit rate of a commercial blu-ray disc is around 30mbps. And standard DVD? 5-10mbps. The lower bit rate you set the smaller file size you get. You’d better try with some smaller files first before Stream all MXF files to QuickTime MOV.
Step 4. Specify a folder to save the converted QuickTime MOV files.
Click the “Browse” button next to “Export to” field and specify an output folder to save converted files. Click “Choose” to confirm.
Step 5. Start transcoding MXF to QuickTime MOV
Click “Convert” to start converting MXF to QuickTime MOV format when everything’s ready. The MXF Video Converter supports batch conversion so you may load multiple MXF files and convert them to QuickTime MOV at one time. You may also join MXF files together by checking the box “Merge into one file” before conversion starts. After conversion you may click “Open” button to find generated QuickTime MOV files and use them freely.

|
|
